Buses
Ikarus
Ikarus EAG 395
The bus was never fully released so there are few bugs, like:
- There is no ticket printer and cash desk (so make sure to have ticket selling on simple (with simple you can use keyboard shortcuts) or off).
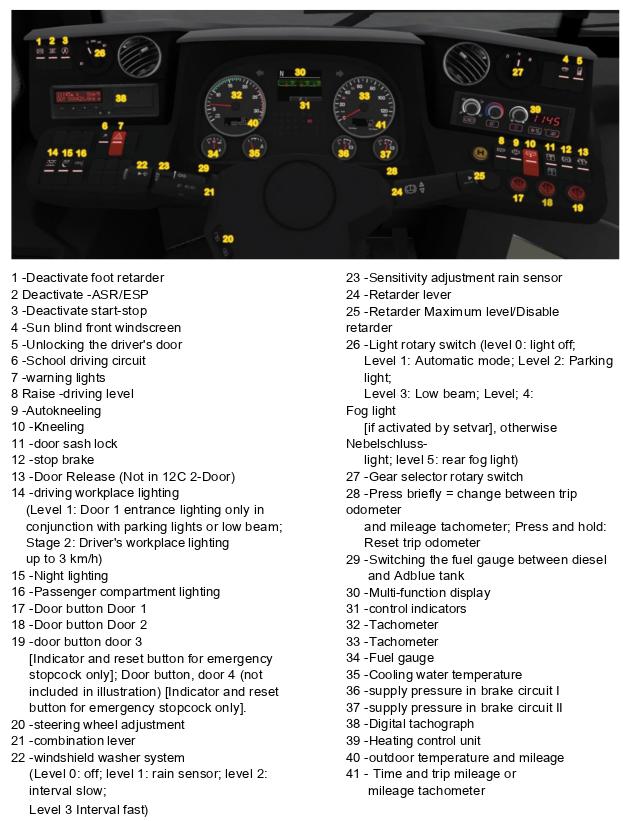
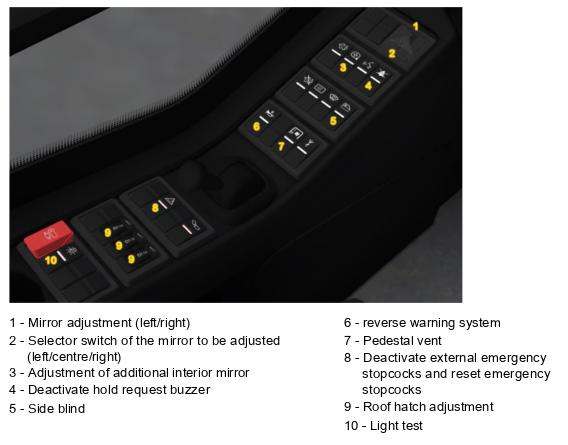
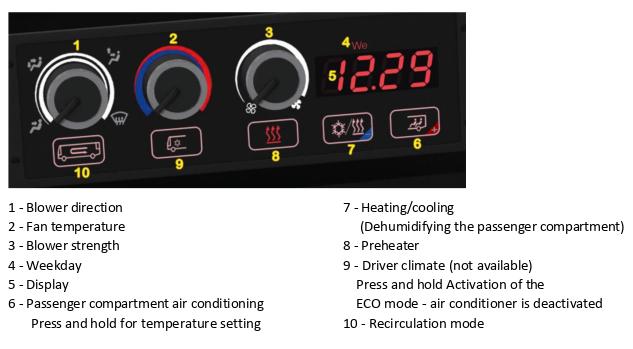
Dashboard buttons we've fiqured out
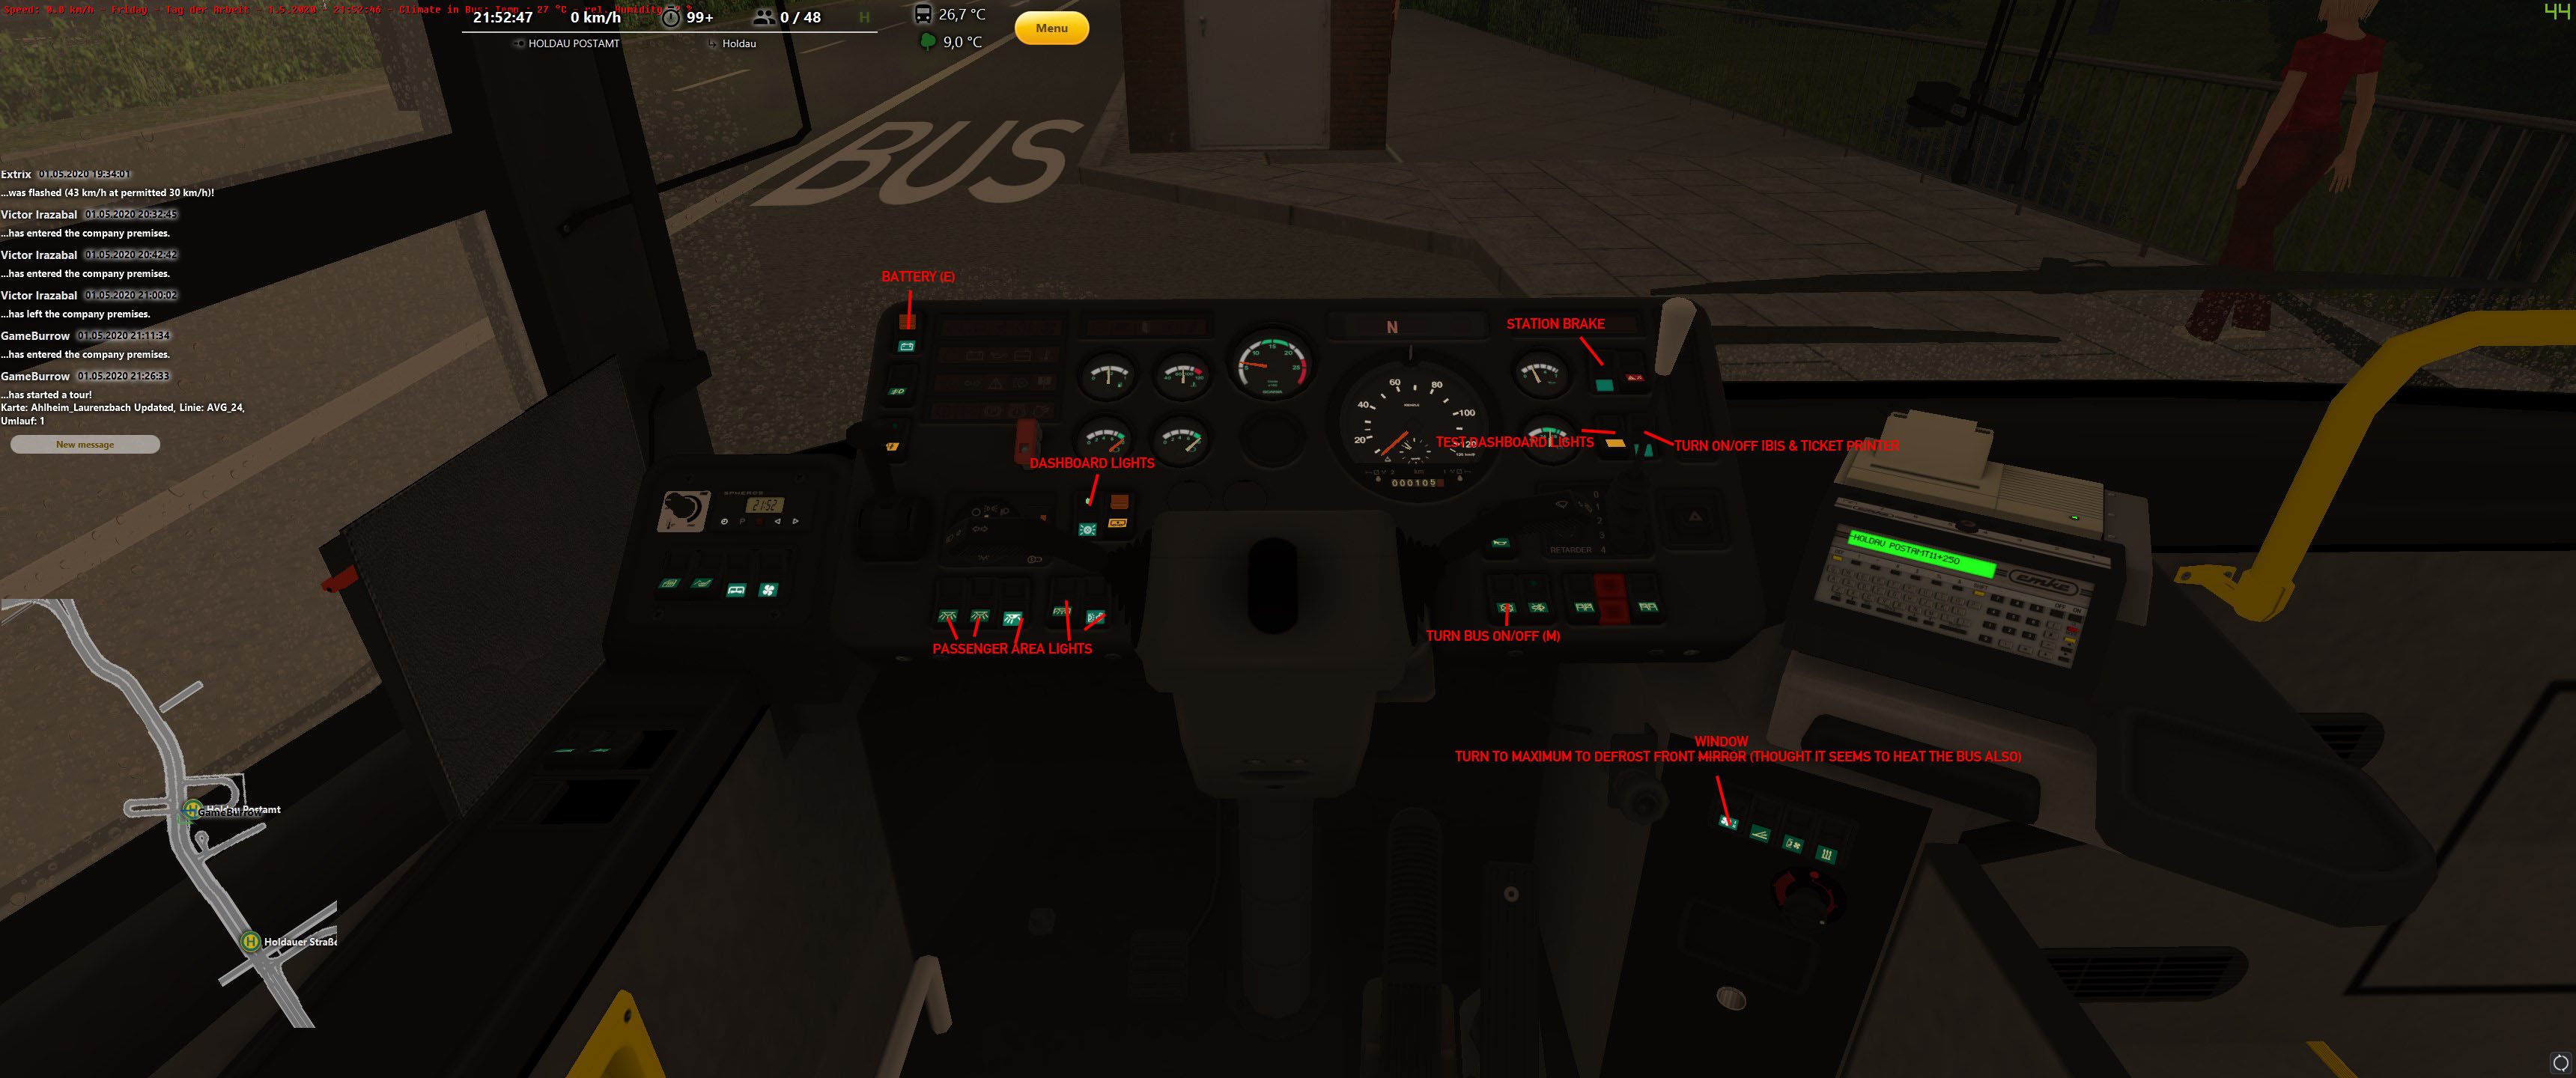
This is manual gearboxed bus. If you want to have simpler logic: just pressing gear keys, no clutch, enable following setting in OMSI:
By default, manual gear buttons in OMSI are:
N, R, 1, 2, 3, 4, 5 (numbers in the number row, not numpad), Tab is clutch if you didn't enable automatic clutch
Iveco
Jelcz
Jelcz 120M


1. Opening the first half of the first door
2. Emergency power switch
3. Handbrake
4. Tachometer
5. Engine off button
6. Fuel level indicator
7. Coolant temperature indicator
8. Voltage indicator
9. Oil pressure indicator
10. Air pressure indicator
11. Low air pressure indicator
12. Low oil pressure check
13. Battery indicator
14. Coolant temperature indicator
15.Prędkościomierz
16. Switch for hazard lights
17.Stacyjka
18. Combination switch for turn signals, wipers and main beam
19. Traffic lights control
20. Checking direction indicators
21. Fuel reserve check
22. Low air pressure indicator
23. Handbrake indicator
24. Retarder switch (not applicable to 120M / 3)
25. Transmission selector switch box (not applicable for 120M / 3)
26.Lighting switch for external direction boards
27. Three-stage light switch
28.Switch front fog light switch
29.Switch rear fog light switch
30. Driver cab lighting switch
31. Passenger area lighting switch
32.Scope passenger lighting switch
33. Stop brake switch
34. Blower switch on the front window
35. Heater switch
36. NZ stop call for door 1
37. Door NZ stop control indicator 2
38. Door NŻ stop indicator 3
39. Door opening and closing button 1
40. Door opening and closing button 2
41. Door opening and closing button 3
42. Door alarm button
43.Heating switch
44. Airflow control panel
45. Display driver
Jelcz M125M & M185M
Operating instructions
Instructions on how to operate this bus, can be seen on this video starting from 0:41
IBIS
PIN: 3296
Instructions on how to operate the IBIS can be seen on video starting from 1:55
MAN
MAN Lion's City A21 Bus-train (Münich)
All following info originates from the original manual
You can view the full manual here: https://store.steampowered.com/manual/730261
Buttons

MAN New Lion's City
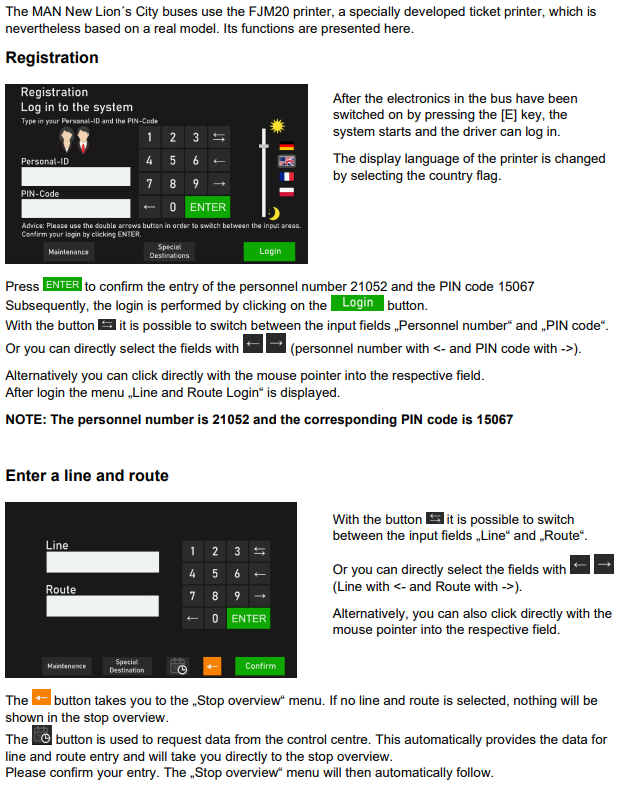
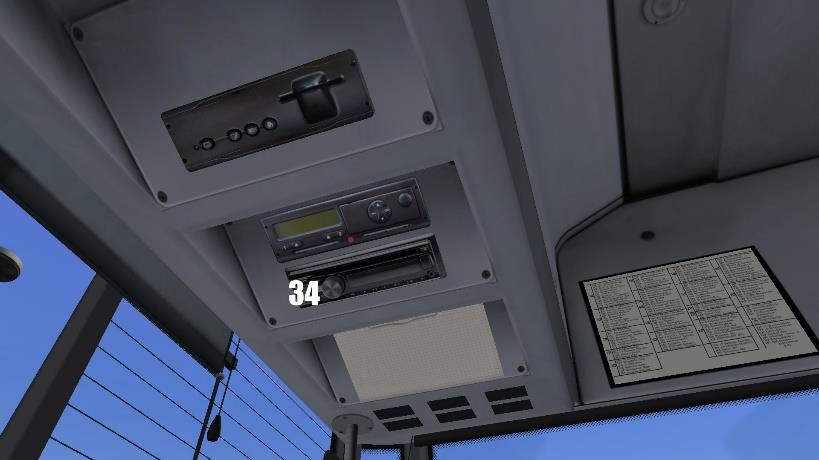
Ticket printer
- Personel number:
21052 - PIN code:
15067
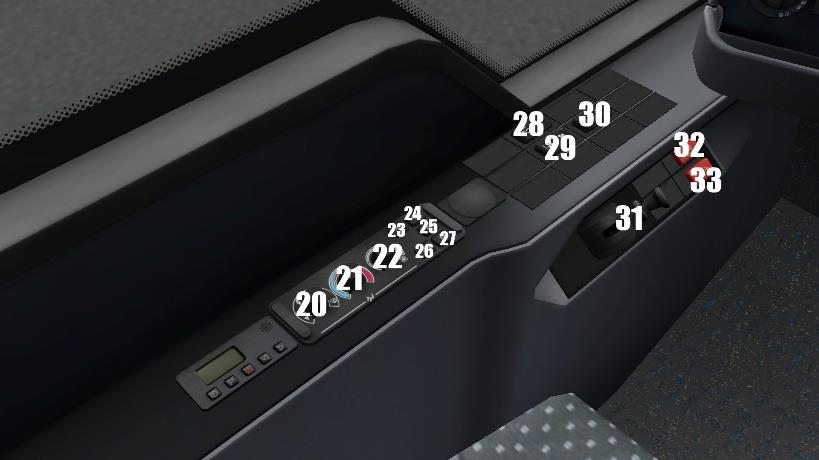
Dashboard
Side area
Heating Control
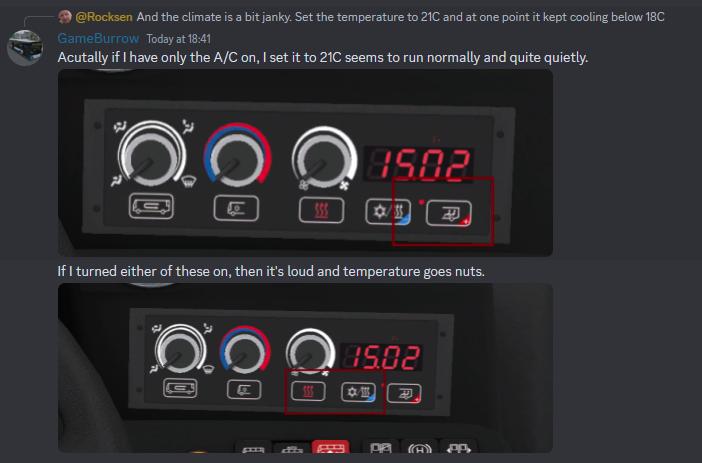
Community findings about heating control
It seems it will target degree lower than you set it to (if I set it to 22C, it will target up to 21C)
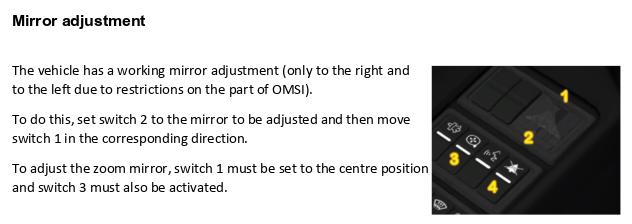
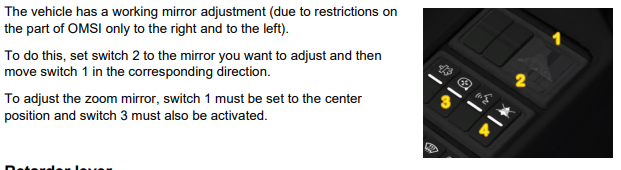
Mirror adjustment
Translated readme
Original readme ran through DeepL translator: https://cloud.gameburrow.codes/s/mr62f8cdHRYKYPt
MAN Interurban Lion's Intercity LE
QUICK START
Select the manufacturer „MAN Lions Intercity LE“ when placing the vehicle. Here you can now select one of the buses supplied in the AddOn under Type.
Start the electrical system [E] and the motor [M]. Select a gear [D] and release the parking brake [.]. Please note, the brake must be applied to engage a gear. Depending on the pressure in the system, the bus will now start rolling and you can accelerate and steer it.
At night, you should activate the headlights [L] and illuminate the interior [8] [9]. If passengers are to board the bus, you need to set destination signs that passengers „know“ at each stop. This is done in the printer setting menu.
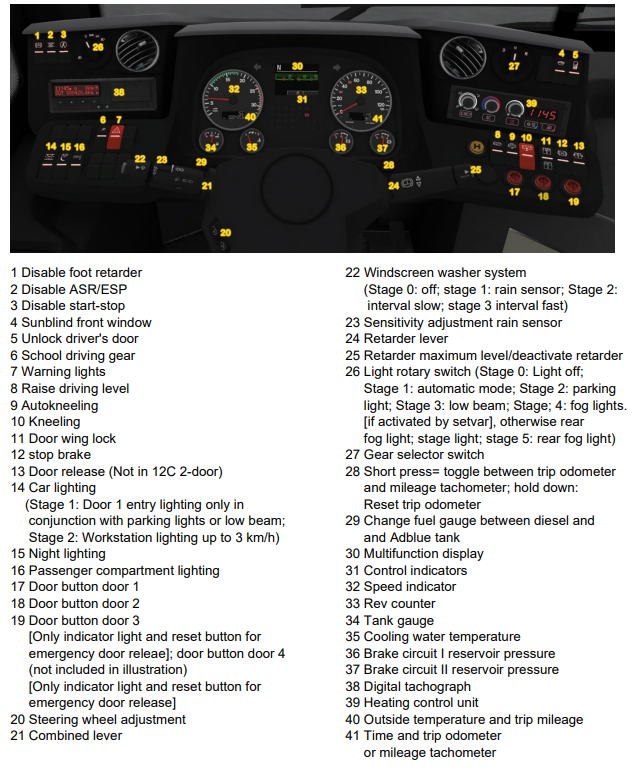
DRIVER WORKSTATION / DASHBOARD
Below is an overview of the controls in the driver's area of the bus. The individual functions are briefly described on the following pages.
Dashboard
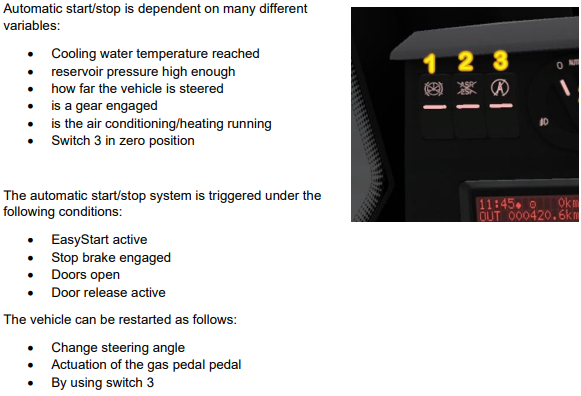
Automatic start/stop
Side area

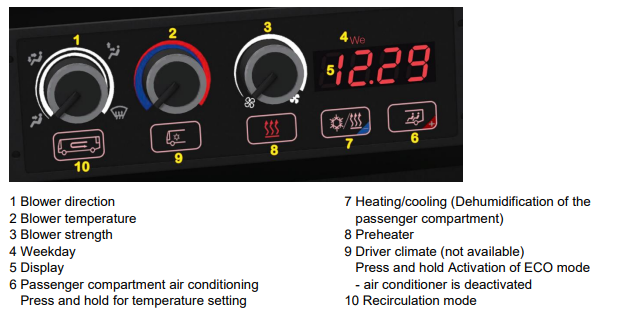
Heating control system
Mirror adjustment
TICKET PRINTER
Mercedes-Benz
MB Citaro
Dashboard

1 heating control panel for the driver (explanation below)
2 Mirror heating (functionless) Symbol appears in the display
3 indoor hot water heater
4 Electric window lift
5 skylight
6 parking brake
7 Emergency
8 interior lighting
9 vehicle lights
10 ASR switch
11 Warnblinker
12 Status panel
13 driver information display
14-stop brake
15 School travel switch
- Left blinking turns it off
16 Door keys
17 Door Lock
18 Door release (only with automatic doors)
19 gear selection buttons
20 automatic door lock door 2
21 Automatic door lock door 3
22 Automatic Kneeling (doors must be closed)
23 Manual Kneeling
- If doors are closed: tap briefly, then open doors
- If doors are already open: keep the button pressed for 3 seconds
24 Quit button
- Ends OBD mode
25 System / Info button
- System: Gets OBD mode / switches to the next system
- Info: Gets information about the respective system
26 display change key
- Upper button: changes display information upper field. Press and hold to permanently display the current menu
- Lower button: Switches between outside temp and consumption (only facelift)
27 deactivate retarder
28 Retarder permanently active
29 Notheben
30 switches for roof air conditioning (not adjustable)
31 Switch for lifting the car body
Heating panel

1 air distribution controller for cockpit
2 temperature selector for cockpit
3 blower controls for cockpit
4 driver's air conditioner (controllable with 1, 2, 3)
5 recirculation / fresh air
6 Dehumidification for the entire bus
- Air conditioning and interior heating are included
switched on
7 heater
MB Citaro Facelift
OPERATING THE BUS
- All information concerning the function of each button along with certain variables for editing are the same as in normal Citaro, which can be seen here: MB Citaro
- Novitus Nano E ticket printer
- Click and hold the ‘C’ button for a few seconds,
- The function buttons (F, F1-F4) are used to select the ticket (see below for further information)
- Click OK to print the ticket
- Money is located in the Money-box. In order to gain access to it, click the key to unlock it, and then pull to

|
F1 |
Fahrschein norm. |
|
F2 |
Kurtzstr. erm. |
|
F3 |
Tageskarte norm. |
|
F4 |
Fahrschein erm. |
|
F + F1 |
Kurtzstr. erm. |
- Door commands (use only these to operate the doors!)
|
Door 1 |
KY_bus_doorfront0 |
|
Door 2 |
KY_bus_doorfront1 |
|
Door 3 |
KY_bus_doorfront2 |
|
Door 4 |
KY_bus_doorfront3 |
MB Connecto / Citybus 628 DLC
Dashboard

1. Emergency lights
2. Lifting the bus
3. ASR on/off
4. Exterior lights
5. Passengers lights
6. Driver’s light
7. Horn
8. Wipers
9. Turn signals / high beam
10. Adjusting driver’s column
11. Ignition switch
12. Display switch (upper and lower)
13. Door all button (setvar)
14. Kneeling
15. Gearbox buttons
16. Front door lock button (setvar)
17. Door release by passenger (setvar)
18. Electric brake
19. Door buttons
Dashboard (side)
20. Switching air vents
21. Driver’s cabin temperature control
22. Adjusting the power of air vents in the driver's cabin
23. Driver’s cabin air conditioning
24. Internal air circulation
25. Automatic temperature control in the passenger area
26. Defrosting
27. Auxiliary heating
28. Heating mirrors and windows
29. Roof air vent mode auto/manual
30. Roof hatches open / close
31. Parking brake
32. Emergency release of electric brake
33. Emergency power off
Dashboard (top)
 34. Radio on/off
Starting bus
• Ignition switch to position 1 (Button No.11)
• Wait some seconds
• Start engine (ignition to position 2) (Button No.11)
• Press the brake lightly
• Click gearbox button (No.15)
• Release the parking brake (No.31)
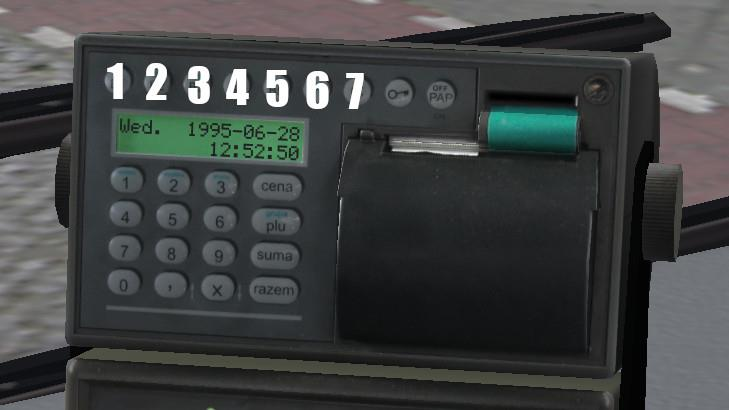
Ibis

1. Number 1 / changing the ticket zone
2. Number 2 / blockade of validators
3. Number 3 / turn on/off ibis
4. Number 4 / setting line without route
5. Number 5
6. Number 6
7. Correction of next busstop (backward)
8. Start route (not obligatory)
9. Correction of next busstop (forwardward)
10. Cancel
11. Play announcement
12. Number 7 / setting line with route
13. Number 8
14. Number 9 / Play announcement
15. Dallas key (use to log in to ibis)
16. Request to talk to the dispatcher (not used)
17. Incident announce (not used)
18. Volume of announcement
19. Menu
20. Ticketprinter
21. Sending report (not used)
22. Number 0 / ibis logout (click 3 times)
23. Enter
Turning on ibis
Setting line with route
• Click Number 7 (No.12)
• Put line numer ; click enter
• Put route numer ; click enter
• Put day type (is not used, can be 0) ; click enter
• Set negative or not (negative of displaying linenumer) by arrows No.7, No.9 ; click enter
• Choose departure/check route by arrows No.7,No.9 ; click enter
Setting line without route
• Click Number 4 (No.4)
• Put Line number ; click enter
• Put Terminus number ; click enter
• Set negative or not (negative of displaying line numer) by arrows No.7, No.9 ; click enter
• Put route numer (is not obligatory) ; click enter
• Set with or without route ; click enter
Ticketprinter
1. „B1” Ticket No.1 (with „F” Ticket No.6)
2. „B1” Ticket No.2 (with „F” Ticket No.7)
3. „B1” Ticket No.3 (with „F” Ticket No.8)
4. „B1” Ticket No.4 (with „F” Ticket No.9)
5. „B1” Ticket No.5 (with „F” Ticket No.10)
6. „F” Function (changing range of tickets)
7. „C” Cancel
Selling ticket
Scania
Scania Citywide GN14
Startup
To start the bus you need to press "E" to increment the position of the key. Press "M" to decrement.
Position 0: Remove key
Position 1: Insert key / shut off electrics
Position 2: Start electrics / stop engine
Position 3: Ignition on
Position 4: Start engine, hold "E"
CAUTION!
If the engine is on high idle speed due to cold temperature or activated by the high idle switch, start with caution. Due to the high RPM the torque converter is very strong on idle speed. It is recommended that you wait until the RPM reaches the normal state.
Door control
All three doors are manually controllable. The third door can be controlled automatically as well.
Third door manual: Door clearance switch, ( - ) key on the numpad
Third door automatic: 20h-switch, Roll-Key on the keyboard

1 Status indicators
2 Driver's information display
3 Display control and brightness selector (+/-)
4 Engine high idle speed switch
5 (Quit-key. Doesn't exist anymore)
Right arrow to confirm a selection
7 Manual kneeling
8 Reject kneeling
9 Increase/decrease height of the bus
Modes will be successively switched
10 Door wing lock
11 Door clearance for third door
This activates automatic door operation
12 Gear selectors
13 Stop request reset
Third door button controls third door manually

1 Driver's cab lighting
2 Cabin lights
Seperate control for trailer and front end. High and low mode selectable
3 Climate control
Sets temperature automatically to 20 °C
4 Disable traction control
5 Lights check
Press again to disable
6 Articulation overbend protection override
7 Fuel heating (No function)
8 Foglights control
9 Windscreen washing
10 Light switch
11 Hazard lights

1 Temp control for driver's cab
2 Air fan control for driver's cab
3 Air flow control for driver's cab
4 Door heater
5 Dehumidifier
6 Pre-heating
Only on stopped engine
7 Floor heater on entry
8 Dashboard unclamp (No function)
9 Microphone switch
10 Alarm LAT (No function)
11 Switch key for video surveillance monitor (No function)
12 Reset for door emergency handle
After pulling a door emergency handle you need to pull it again and then press this button to repressurize the door
13 Parking brake
14 Rooflights control unit
15 Outside door lighting
16 Automatic hazard light mode
17 Mirror heater
Driver's Information Display
The driver's information display can be controlled with the display page change switch (3) and the arrow keys (6). When driving you can only use the page change switch (3). It can cancel messages and shows pressure and fuel status. The arrow keys can only be used when standing still, engine stopped and ignition switched on. Press "i" to call the main menu. With the arrow keys you can select a menu.
Up: Recall warnings
Down: Open settings
Right: Show status pages or confirm a selection
Atron-Printer
C - Cancel/Exit
Arrow up - Next bus stop
Arrow down - previous bus stop
Enter - Confirm
After starting the electrics you need to enter your ID and PIN code.
ID: 9691
PIN: 1805
Solaris
Solaris PL Megapack
IBIS is missing fonts
![20190814_202035[1].jpg](https://wiki.gogroupvirtual.eu/uploads/images/gallery/2019-08/20190814_202035%5B1%5D.jpg)
You need to install the fonts from Jelcz Citybus pack also:
https://cloud.gameburrow.codes/index.php/s/5bPZfcBz3igNEbf
Operating instructions
Instructions on how to operate the IBIS, can be seen on this video starting from 1:57. Yes the bus in the video is Jelcz, but uses the same IBIS, only thing different is PIN which is 1234
IBIS
PIN: 1234
Known bugs \ FAQ \ New bindings
(or that, what you think are bugs)
-To turn on beam lights you have to press twice L, to turn off we use shift+L
-To turn full beam lights permanently you have to hold F button
-Fog lights can be turned only with mouse and you have to pull up/down switch
-To insert key into ignition, press E, to start engine keep pressing E till it starts, to turn off engine and pull out key keep pressing M
-Button for opening driver doors form outside need to be held till doors will open
-Urbino 15 can sometimes struggle to start moving
-Exhaust gases fly out from bottom even if we have chosen [setvar] with exhaust on roof
-Manual retarder binding: retarder_wiecej i retarder_mniej
-SU15 when placed on map can dive in the ground (just start electricity to fix it)
-With FAP and ACTIA dashboard one switch turn on all lights and the other one turn off one which is closest to driver
-Yes, you can start driving with bus stop brake in Euro 5 and Euro 4
-Emergency door opening doesn’t work and won’t work
-You have to use brake to insert a gear otherwise gear won’t enter (also keep low rpm)
-On startup engine is on choke which will affect in waving rpm’s. Choke will turn off above 30 degree of coolant
-To change registration plate you have to paint it on 03 texture
-Time before closing doors can be changed in doors constfile in script_xx_moki folders
-Multidisplay mode can be changed with pressing button near that display or you can add keyboard binding: licznik
-Second daily mileage start counting from first time choosing it (kinda bug)
-Kneeling sometimes can bug and won’t stand up automatically so you have to do it manually by pressing kneeling button up
-Doors sometimes will bounce, it is Auto reverse system
Volvo
Volvo 7700 FL

1- Driver air flow temperature
2- Driver airflow direction
3- Blow-in output (3.1 internal circuit)
4- Class heating temperature
5- Light knob
6- Backlight intensity
7- Hazard warning lights switch
8- Power switch
9- ASR switch
10- NO FUNCTION
11- Retarder switch
12- Height adjustment
13- Kneeling
14- Transmission buttons
15- Driver lighting
16- Front deck lighting
17- Class I lighting
18- Class II lighting
19-NO FUNCTION
20- NO FUNCTION
21- Door and half locks
22- 1,2,3 door buttons
23- Button to open all doors
24- Horn
25- On-board computer BACK
26- On-board computer ENTER
27- On-board computer UP / DOWN

28- Rear sunroofs
29- Front sunroof
30- NO FUNCTION
31- Door programming (but a warm button that only opens the door)
32- Switch and blowers
33- Blower switch II
34- Blower switch III
35- Parking brake lock
36- Handbrake
37- Pixel KPP-2 SWITCH
38- Pixel KPP-2 CANCEL
39- Pixel KPP-2 CONFIRM
40- Pixel KPP-2 UP / DOWN
41- Pixel KPP-2 NO
42- Pixel KPP-2 YES
43- Pixel KPP-2 CHANGE
How to start the bus?
1. Press the E button
2. When you hear the chime, press M
3. Press M again
4. After the clock is fully initialized, you can start the engine, so press M again
Light control works just like in Solaris, i.e. by using the L / Shift + L keys.
Pixel system user manual
- Login: 1111
Password: 666666 - A)
I Select a schedule
Option II will be selected automatically
III Accept the selected option
IV Done
B)
And Enter Menu / Line
II Enter Line Number
III Select a direction from the list
IV Accept
V Done
Volvo 7700A FL
Original readme included with the bus download!
Performance
This is quite a complex addon, and we are by no means professionals. Some scripts could have been written better, more optimized. Also remember, that OMSI was designed to handle simple, old fashioned buses, with less complex systems, and less electronics. You may need to lower your settings in order to reach your usual FPS on heavier maps with this bus.
First drive
After installing, don't forget to copy your favourite maps' .hof files and Linienlisten .jpg files to the buses corresponding folders.
When you open OMSI, you will find the bus under the manufacturer Volvo, with the two subtypes listed.
WARNING
Unless you have an SSD drive, the bus can take up to 1-2 minutes to show up. It may seem that OMSI crashed, so just be patient and wait for a bit. After selecting the bus, it will again take some time for OMSI to load in all the scripts/textures and to place the bus.
After the bus was placed, hit the Electricity On/Off key ('E' by default) once to switch on the main electronics.
If you selected the Ticketbox version, it will fire up and ask for a driver ID and PIN.
The default ID is 2512, PIN is 2208, see the modding section on how to change these.
Press the Electricity On/Off key one more time, and the on-board computer will boot up, performing a selftest. If there is not enough air pressure, you will hear a continous warning sound. After the test is completed, pressing and holding the Electricity On/Off key will start the engine (you may need to blip the gas a bit while starting). Now that the engine is running, the air pressure will start to build up and the warning sound - if it was present before - will stop. While applying full pressure on
Detailed tour of the driver's place
Middle panel

1. Turbo pressure
2. Oil pressure
3. Coolant temperature
4. Rev counter
5. Speedometer
6. Fuel gauge
7. First and second air system pressure
8. Main display: Out/inside temperature, clock, odometer, door status
Left side panel

1. Hazard warning switch
2. Dashboard backlight dimmer
3. Headlight switch (pull up for front foglight, push down for rear foglight)
4. Main electricity switch
5. Anti-Jackknife protector override
6. ASR override
7. HSA (Hill Start Assist) switch
8. Level up/down
9. Kneeling switch
10. Cabin A/C
11. Additional heating
12. Cabin temperature control (not simulated)
Right side panel

1. Open/close first door
2. Open/close second door
3. Open/close third door
4. Close all opened doors
5. Mirror and windscreen heating (not simulated)
6. Bus stop brake
7. No function
8. First door wing lock
9. Driver's place lights
10. No function
11. Cabin light 1
12. Cabin light 2
13. No function
14. Gear selector
Left hand panel

1. Open/close rear roof hatch front
2. Open/close rear roof hatch back
3. Open/close front roof hatch front
4. Open/close front roof hatch back
5. Parking brake
Known bugs
- the engine is very prone to stalling, especially when reversing
- the onboard destination sign can't display some characters, like ö,ü,ő... (needs a different font)
- the suspension of the bus is a bit too "wobbly"
- the bus is not AI compatible
Unupported buses
Iveco Crossway LE
IBIS Codes
Fahrernummer: 6924
Pin: 5173
Dashboard buttons

1: toggle display: Switches the central display by, for example, Ads such as the current supply pressure o.Ä. show.
2: Interior light: Level 1: Half light / Level 2: Full light
3: Driver's seat light: unlike most buses, in the Iveco the lamp above the driver's area does not turn on when the parking light is active. For manually activating the driver's workplace lighting, the symbol with the steering wheel is clicked, for illuminating the area when the door is opened, the switch must be at the door position.
4: hazard warning lights
5: ASR
6: Retarder
7: Engine start / stop: With the Iveco it is regulated so that the starting process can be completed either completely exclusively by means of the ignition lock, alternatively also as soon as the ignition was activated over the lock the engine can be turned on or off even with this key.
8: Rotary light switch
9: stop brake
10: Kneeling: Bus descends to the door side as soon as the button is pressed and one of the doors is opened. As soon as the door is closed, the vehicle will return to normal.
11: Lifting the Carriage: Raise the car body by a few inches.
13: School driving switch: If this is activated, the hazard warning lights will light up. These are switched off by pressing the button again, or alternatively the indicator is set to the left.
14: Gear selection button. Sets the gear. To change gear, the service brake must be completely passed through.
15: Door switch. Opens according to the inscription corresponding door.
16: Combination lever: Sets indicator, windscreen wiper, horn or similar.

1: Electric front blind. Depending on the tilting direction of the button, the electric front blind is raised or lowered.
2: fans
3: roof hatch front
4: roof hatch rear
5: Spring brake valve: releases the parking brake
Heating panel

The heating control takes place here as follows.
The heating control unit is switched on with the button (1).
With (2) the auxiliary heating could be activated.
(3) activates the circulating air.
With (4) and (5) the blower level is set. The fan cools the bus down a bit. (Does not have the effect of air conditioning!)
Use (6) and (7) to set a temperature between 20 and 24 degrees Celsius, to which the bus heats up if the temperature is below the set number of degrees.
In the fast bus variant, the bus is cooled down to the temperature, in the normal lack of air conditioning not.
Attention: Blower and heater can not run at the same time!
Ticket printer / IBIS
As a ticket printer, as mentioned, the Almex Optima CL is installed.
Most features of the printer are self-explanatory, so here's just the essentials.
The registration takes place with the following data:
Fahrernummer: 6924
Pin: 5173The line input is in the following format:
Line number: 07600
Journey number (= route): 01/02 etc.
(Example here is the line 76 from Grundorf, but I think it's self-explanatory.)
Points of interest can be selected by clicking in the various menus.
A destination input (ziel) is not possible, you need to use the OMSI Alt destination tool.
MAN Lion's City A20 (V3D)
Getting started
To start the bus press E to enable the electrics and then hold M to start the engine. It won’t
start if the gearbox is in any other gear apart from neutral (The display will notify you). Either
press D or rotate the gear selector to ‘drive’ (With brake pedal pressed) and release the
handbrake on your left hand side (Or with . ) To open and close the doors press - for the front
and = for the rear. The stop-brake is not required in this add-on for the doors to operate.
NB. Take a look at the dashboard guide (Below) to help you navigate the various buttons.
Using the ticket machine
It’s very easy use without programming any timetabled journeys. If you are at a stop and
front door is open you will be shown the ticket menu by default. Choose an appropriate ticket
and print!
If you wish to see the next stops on your journey then simply program in your route and
journey information from the main menu using the LINE/COURSE (eg. 07600) and ROUTE
(eg. 1) options. Automatic announcements will only play if you are running to timetable.
A LAWO information display is installed in the saloon and will echo the next stops on your
timetabled journey.
Dashboard Guide


Known problems
There are some issues you may experience during the course of play that are expected due
to the nature of the game or the limitations of my expertise in scripting. Some of those are
listed below:
- Gear display freezes or disappears when prompted with an error, such as F uel Low.
A work around is to press the Cycle Error Messages button until it clears, fill tank with
fuel or use the game menu to repair the bus. - Snow flake icon doesn’t go when electrics are turned off.
- The outside body textures appear white or black. It seems you may have low
graphics memory. Re-start the game and/or install the 4Gb patch to increase
available memory to OMSI2 - Low FPS once the bus is loaded. I have played many hours in OMSI2 and rarely get
below 30fps. If I do it’s usually the fault of the game and a full game re-install usually
fixes the issue. Having said that I do have a mid-range gaming setup but it may
perform poorly on low-end systems, such as laptops with integrated graphics cards.
MAN Lion's City A21/A37 (V3D)
General operation
Once your bus has loaded you can go ahead and press 'E' to turn on the
electrics and then 'M' to start the engine. Engage first gear by pressing 'D',
remember to press down on the foot-brake first or it won't engage. Most other
controls are standard or as mapped on your particular installation but further
information can be found by referring to your OMSI2 manual.
Once you're moving I'm sure you'd like to pick up some passengers but for
realism there a few things you might like to check out first.
Depending on the time of day and year you should set the air conditioning to
either auto for cooling or fan for gentle heating. The Spheros controller is
located above your head and provides you with cabin temperature display. Be
sure to keep an eye on it so your customers don't complain.
You'll need to light the passenger saloon, keys 8 and 9 should work by
default, but you can also use the buttons on the dashboard.
Doors can be operated by pressing minus for the front and F12 for the rear if
required (These doors operate automatically when passengers want to
leave). Remember to turn on the bus-stop brake first or the doors won't work.
Use the Backspace key or the button on the dashboard with H in a circle.
Please note that certain buttons are obscured by the steering wheel, click the
steering column with the mouse and the wheel will vanish. Click once again to
bring it back.
To start your first route you'll need to set the display on the iBIS controller,
also located above your head. First click Line and enter 07600 (Using
Grundorf route 76 as the journey) and click Enter. Next you need the journey
number. Click Route and enter either 1 or 2 depending on your direction and
once again click enter. You should see the information on your matrix display
now and passengers will want to hopefully board your bus.
Dashboard

Known issues
- No outer dirt layer
- Dashboard gear notifier is difficult to see when side/head-lights on in day or off at night
- Dashboard gear selector dial doesn't work
- Indicator / windscreen washer stalk has no interaction.
- No disabled ramp
- AI use is memory hungry and no 'lite' version for them has been created as yet
MAN Lion's City Pack
This page is for the A21 (3-door), A23 (4-door) and A78 from the MAN Lion's City Pack for our company
Dashboard

1 tachometer
2 tachograph
3 baseline driver's display
4 indicator left
4 turn signal on the right
5 fuel level
6 engine temperature
7 barometric pressure, 1st circle
8 barometric pressure, 2nd circle
9 indicator lights
10a outside temperature
10b daily and total kilometer counter
11a Outdoor light selection
11b gear selection
12 retarder on / off
13 ASR on / off
14 heating windscreen
15 hazard warning lights
16a, 16b lighting passenger compartment
16c lighting cab
17 parking heater (Webasto)
18 engine room fire
19 Kneeling on / off
20 fans passenger compartment
21 front door lock
22 Opening (top) / closing (bottom) of all doors
23 door release
24a, 24b, 24c door control: 1, 2, 3
MAN Lion's Coach
Dashboard layout

1. 1st door
2. 2nd door
3. Bus stop brake
4. Door lock
5. Passenger area displays switch
6. Entertainment system main switch
7. Dummy functions
8. Reverse gear camera switch

1. Announcements switch
2. Main interior lights
3. Reading lights
4. Night lights
5. Engine ignition
6. Retarder lever (button – on/off // lever - +/- , use mouse for the lever!)
7. AC switch
8. AC regulation knobs

1. Fuel gauge
2. Engine temperature gauge
3. Pressure tank 1 gauge
4. Pressure tank 2 gauge
5. Left screen – internal temperature and mileage
6. Right screen – time and external temperature

1. Cruise control activation
2. Cruise control previous speed
3. Cruise control off
4. Cruise control decrease speed
5. Cruise control increase speed

1. ASR off switch
2. Bus suspension regulation (UP and DOWN // requires parking brake and neutral gear!)
3. Hazard lights
4. Kneeling function (the bus kneels when the bus stop brake is active and one of the doors is opened)
5. External lights rotary switch

1. Steering wheel regulation switch (requires parking brake and neutral gear! // use mouse on the wheel itself to adjust it)
2. Steering wheel regulation reset switch (requires the previous function to be active // click and hold to move the steering wheel to the neutral position)
3. Mirror heating switch
4. Windshield heating switch
5. Driver’s light
6. Power window regulation switch
7. Sunblind regulation switch
How to start the bus?
1. Turn on the electrics (default: “E” or use your mouse on the key)
2. Insert the card in the tachometer. It is located under the door switches. A simple click will do.
3. Wait for the glow plugs to heat up (heating up is indicated by a symbol lighting up on the main panel, between the gauges)
4. Start the engine (Default: “M” or use the switch)
5. If the air pressure is too low, wait for a bit, you might as well rev the engine for a while.
6. Deactivate the parking brake.
7. Fasten your seatbelt by clicking on the buckle on the upper left side of the driver’s seat! You can unbuckle it by pressing the button on the lower right side of the driver.
8. Put on the 1st gear and you’re ready to go!
Known issues
1. The mirrors may lag a bit, because the rearview camera requires a huge radius to render correctly. If you want them to work smoothly, you can delete the last [add_camera_reflexion_2] entry in the *.bus file, but you won’t be able to use the rearview camera.
2. In MAN Lion’s Coach L, the camera sometimes doesn’t render the body of the bus. This is a limitation of the game, and unfortunately, there’s nothing I can do about it
3. If you’re experiencing lagging, try to decrease the size of some of the textures, especially interior.tga. Remember though to maintain dimensions ratio and use size that is a square of two (2048, 1024, 512, etc.)
4. On steep inclines you might experience some lagging of the engine. I recommend turning off ASR and changing gears at higher RPM, and you should be fine.
5. If you’re having trouble with putting the bus in gear, meaning that when you engage the 1st gear and the symbol on the main display flashes for a brief moment and then immediately turns to neutral again you need to go to “Inputs/gamectrler.cfg” and check if any other steering wheel aside from yours is activated. Just look for a "1" under the name and change it to “0”.
Solaris Electric Family
Sometimes the game bugs out and you can't get the bus to move. In that case you need to de-spawn the bus and spawn in again through the OMSI ingame menu (you won't get any penalty in BCS for this)