# Mercedes-Benz
# MB Citaro
### Dashboard
1 heating control panel for the driver (explanation below)
2 Mirror heating (functionless) Symbol appears in the display
3 indoor hot water heater
4 Electric window lift
5 skylight
6 parking brake
7 Emergency
8 interior lighting
9 vehicle lights
10 ASR switch
11 Warnblinker
12 Status panel
13 driver information display
14-stop brake
15 School travel switch
\- Left blinking turns it off
16 Door keys
17 Door Lock
18 Door release (only with automatic doors)
19 gear selection buttons
20 automatic door lock door 2
21 Automatic door lock door 3
22 Automatic Kneeling (doors must be closed)
23 Manual Kneeling
\- If doors are closed: tap briefly, then open doors
\- If doors are already open: keep the button pressed for 3 seconds
24 Quit button
\- Ends OBD mode
25 System / Info button
\- System: Gets OBD mode / switches to the next system
\- Info: Gets information about the respective system
26 display change key
\- Upper button: changes display information upper field. Press and hold to permanently display the current menu
\- Lower button: Switches between outside temp and consumption (only facelift)
27 deactivate retarder
28 Retarder permanently active
29 Notheben
30 switches for roof air conditioning (not adjustable)
31 Switch for lifting the car body
### Heating panel
1 air distribution controller for cockpit
2 temperature selector for cockpit
3 blower controls for cockpit
4 driver's air conditioner (controllable with 1, 2, 3)
5 recirculation / fresh air
6 Dehumidification for the entire bus
\- Air conditioning and interior heating are included
switched on
7 heater
# MB Citaro Facelift
### OPERATING THE BUS
1. All information concerning the function of each button along with certain variables for editing are the same as in normal Citaro, which can be seen here: [MB Citaro](https://wiki.gogroupvirtual.eu/books/omsi-2/page/mb-citaro)
2. Novitus Nano E ticket printer
1. Click and hold the ‘C’ button for a few seconds,
3. The function buttons (F, F1-F4) are used to select the ticket (see below for further information)
4. Click OK to print the ticket
5. Money is located in the Money-box. In order to gain access to it, click the key to unlock it, and then pull to
[](https://wiki.gogroupvirtual.eu/uploads/images/gallery/2019-07/image-1564484971506.png)
| F1
| Fahrschein norm.
|
| F2
| Kurtzstr. erm.
|
| F3
| Tageskarte norm.
|
| F4
| Fahrschein erm.
|
| F + F1
| Kurtzstr. erm.
|
4. Door commands (use only these to operate the doors!)
| **Door 1**
| KY\_bus\_doorfront0
|
| **Door 2**
| KY\_bus\_doorfront1
|
| **Door 3**
| KY\_bus\_doorfront2
|
| **Door 4**
| KY\_bus\_doorfront3
|
# MB Connecto / Citybus 628 DLC
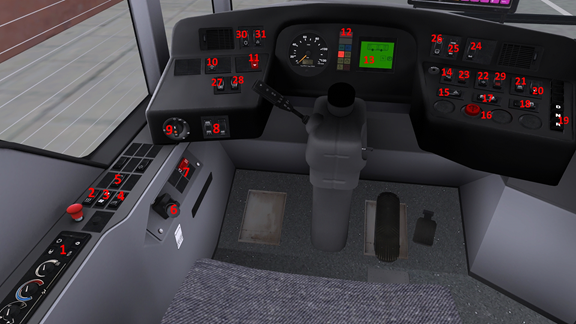
### Dashboard
[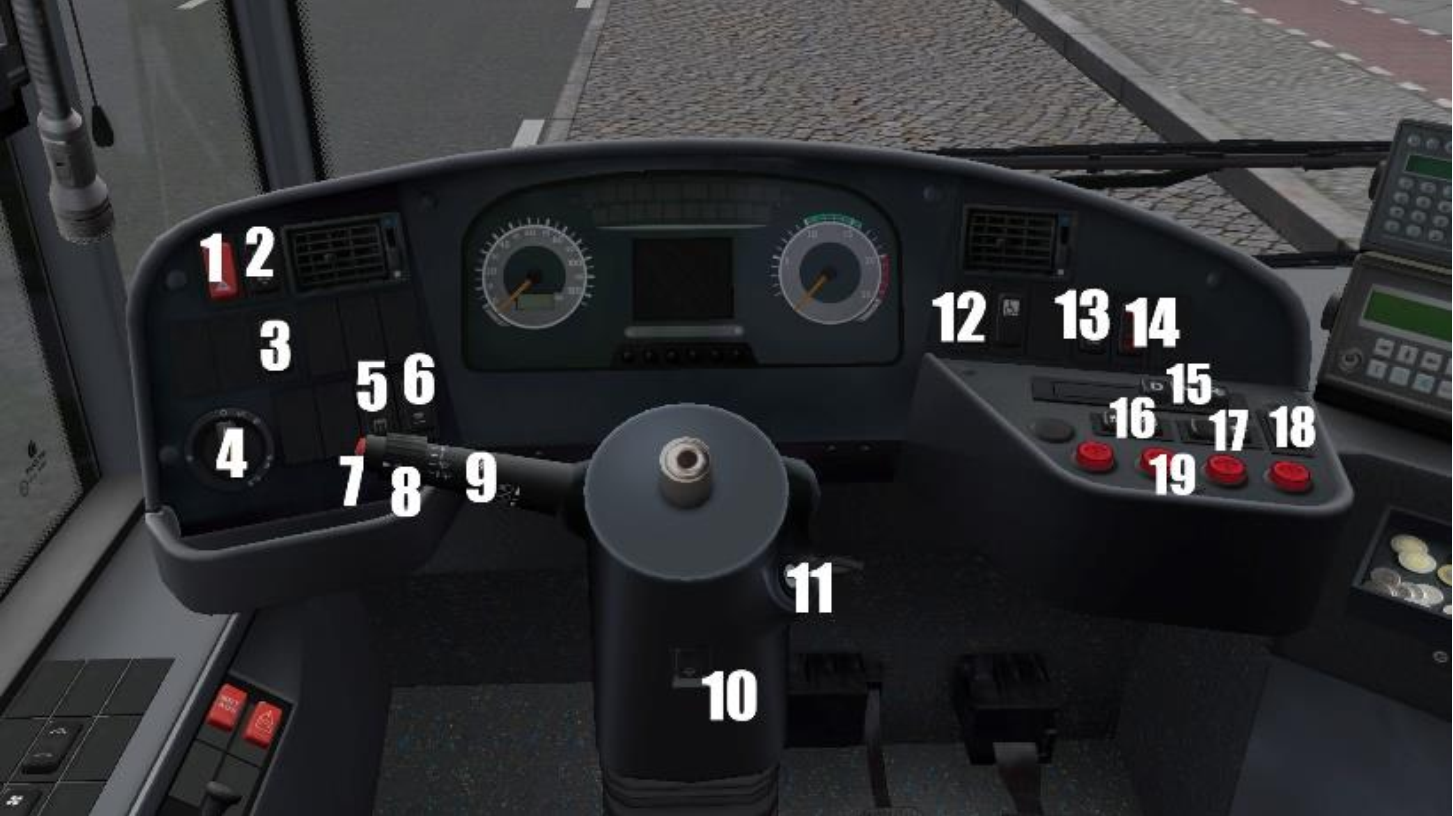](https://wiki.gogroupvirtual.eu/uploads/images/gallery/2020-12/image-1606818300027.png)
1. Emergency lights
2\. Lifting the bus
3\. ASR on/off
4\. Exterior lights
5\. Passengers lights
6\. Driver’s light
7\. Horn
8\. Wipers
9\. Turn signals / high beam
10\. Adjusting driver’s column
11\. Ignition switch
12\. Display switch (upper and lower)
13\. Door all button (setvar)
14\. Kneeling
15\. Gearbox buttons
16\. Front door lock button (setvar)
17\. Door release by passenger (setvar)
18\. Electric brake
19\. Door buttons
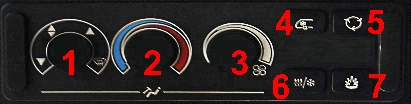
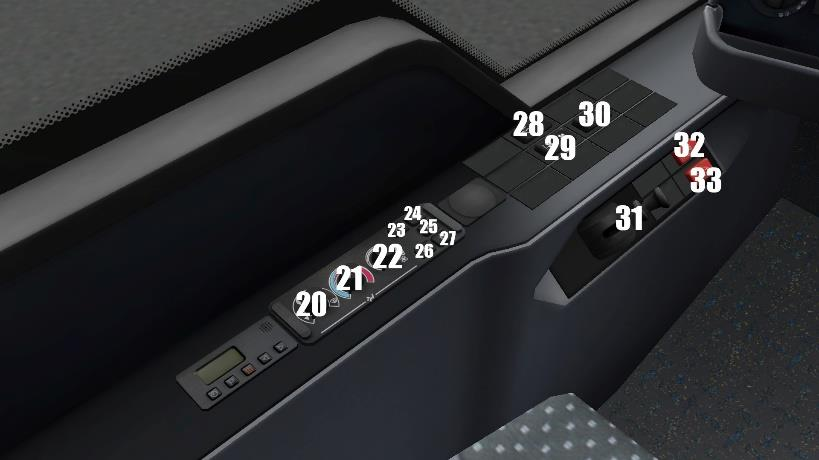
### Dashboard (side)
[](https://wiki.gogroupvirtual.eu/uploads/images/gallery/2020-12/image-1606818325866.png)
20. Switching air vents
21\. Driver’s cabin temperature control
22\. Adjusting the power of air vents in the driver's cabin
23\. Driver’s cabin air conditioning
24\. Internal air circulation
25\. Automatic temperature control in the passenger area
26\. Defrosting
27\. Auxiliary heating
28\. Heating mirrors and windows
29\. Roof air vent mode auto/manual
30\. Roof hatches open / close
31\. Parking brake
32\. Emergency release of electric brake
33\. Emergency power off
### Dashboard (top)
[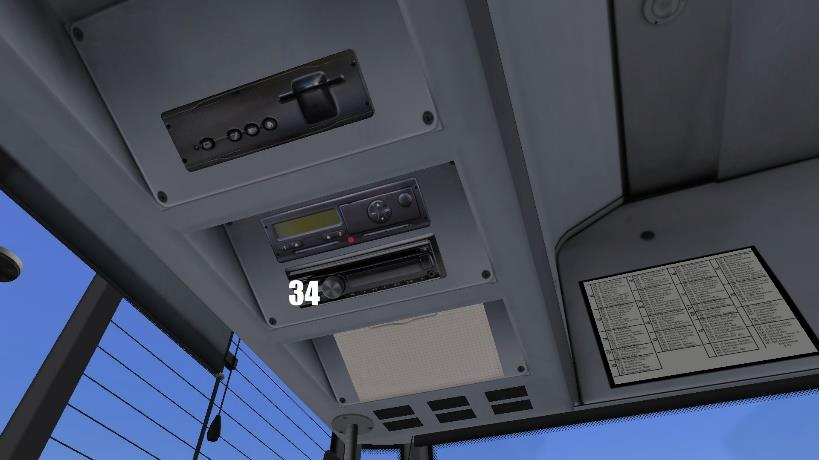](https://wiki.gogroupvirtual.eu/uploads/images/gallery/2020-12/image-1606818365050.png)34. Radio on/off
### Starting bus
• Ignition switch to position 1 (Button No.11)
• Wait some seconds
• Start engine (ignition to position 2) (Button No.11)
• Press the brake lightly
• Click gearbox button (No.15)
• Release the parking brake (No.31)
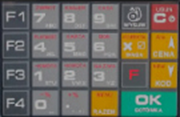
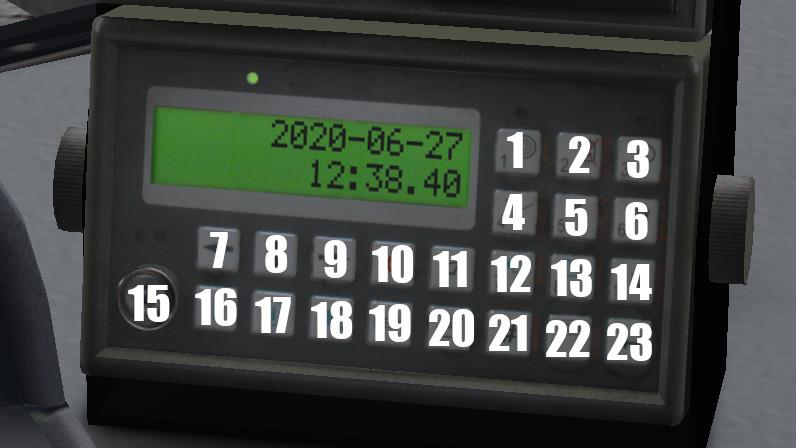
### Ibis
[](https://wiki.gogroupvirtual.eu/uploads/images/gallery/2020-12/image-1606818398612.png)
1. Number 1 / changing the ticket zone
2\. Number 2 / blockade of validators
3\. Number 3 / turn on/off ibis
4\. Number 4 / setting line without route
5\. Number 5
6\. Number 6
7\. Correction of next busstop (backward)
8\. Start route (not obligatory)
9\. Correction of next busstop (forwardward)
10\. Cancel
11\. Play announcement
12\. Number 7 / setting line with route
13\. Number 8
14\. Number 9 / Play announcement
15\. Dallas key (use to log in to ibis)
16\. Request to talk to the dispatcher (not used)
17\. Incident announce (not used)
18\. Volume of announcement
19\. Menu
20\. Ticketprinter
21\. Sending report (not used)
22\. Number 0 / ibis logout (click 3 times)
23\. Enter
#### Turning on ibis
• Click on button No.3
• Wait several seconds
• When on display is „Provide ID?” click button No.15
• Put PIN: 3296
• Click Enter (No.23)
• Wait several seconds
• When on display is date & time can be set line/terminus/route
#### Setting line with route
• Click Number 7 (No.12)
• Put line numer ; click enter
• Put route numer ; click enter
• Put day type (is not used, can be 0) ; click enter
• Set negative or not (negative of displaying linenumer) by arrows No.7, No.9 ; click enter
• Choose departure/check route by arrows No.7,No.9 ; click enter
#### Setting line without route
• Click Number 4 (No.4)
• Put Line number ; click enter
• Put Terminus number ; click enter
• Set negative or not (negative of displaying line numer) by arrows No.7, No.9 ; click enter
• Put route numer (is not obligatory) ; click enter
• Set with or without route ; click enter
### Ticketprinter
[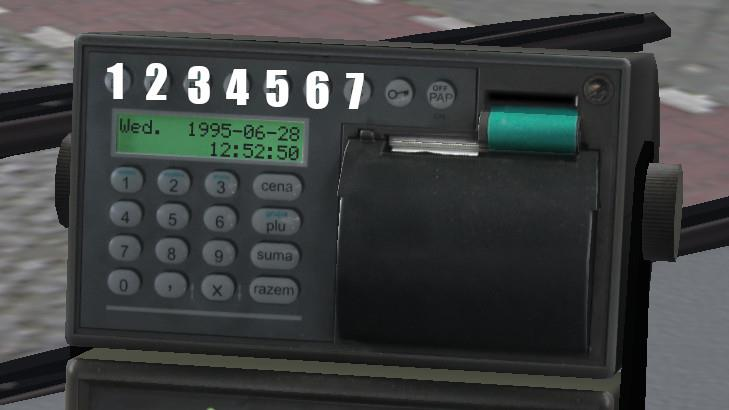](https://wiki.gogroupvirtual.eu/uploads/images/gallery/2020-12/image-1606818490695.png)
1. „B1” Ticket No.1 (with „F” Ticket No.6)
2\. „B1” Ticket No.2 (with „F” Ticket No.7)
3\. „B1” Ticket No.3 (with „F” Ticket No.8)
4\. „B1” Ticket No.4 (with „F” Ticket No.9)
5\. „B1” Ticket No.5 (with „F” Ticket No.10)
6\. „F” Function (changing range of tickets)
7\. „C” Cancel
#### Selling ticket
• Click button B1, B2, B3, B4 or B5 dependly of need.
(for ticket from No.6 to No.10 firstly click button F
and then B1-B5)
• Ticket will be print
• When ticket is printed click on ticket
• Ticket will be move to passenger sale area
• Passenger pickup the ticket